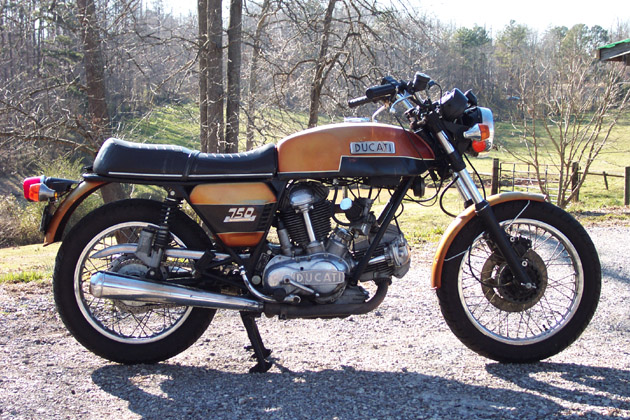

Steve of Shreveport purchased the bike from me. He owns several classic bikes, so the GT has found a good home. This bike epitomizes the concept of Grand Touring, at least for 1974. Power and torque are adequate, and the bike requires little maintenance. With a long wheelbase and the perfect primary balance of an L-twin engine, it offers a smooth ride at speed with little or no vibration. I've heard other Ducatsi say they want a 750 Sport or even an SS, but for me the GT is just great for its purpose: riding on the beautiful country highways and back roads of Tennessee, North Carolina, and Georgia.
Engine Oil
I tried different oils but settled on Valvoline 50 wt Racing Oil. After 900 miles it appeared to be the cleanest and least broken down. Castrol straight 50 wt oil works equally well, but it is hard to find. The oil must be changed every 900 miles because the bike has no oil filter, only an oil screen. The engine does not use plain bearings, the crank and other rotating parts run in ball and needle bearings which reduces the wear and load on the oil. Because of the frequent oil changes and the ball bearing engine, I chose not to use an expensive synthetic oil, though I've heard synthetics work well in bevel drive Ducatis. At oil change, I dump the old oil in a tub for recycling, and clean the screen by rinsing in kerosene. On the road, you can usually talk a service station into letting you change the oil behind their garage.
Valve Clearances
The bike uses shims which you can obtain from shops like Cycle Specialties of Athens, Syd's Cycle in Florida, or Road and Race in Australia. I usually ask for 3 of each shim, then return the 2 that I didn't use. At first I checked the clearance once a year, but it is probably not necessary. The front exhaust is the one to watch, it tends to close up. I believe this is caused by the front valve seat receding due to unleaded gas. Someone on the bevelheads list suggested contacting Mike Duzick at MikMar Motors in Paxinos, PA (570) 672-9110 for hardened no-lead valve seats.
The rear intake valve is hard to get to. I made a bar of 1 x 8 x 1/8 steel to pry the valve down. and brace the bar against the frame to hold the valve down while you remove the shim.
Fuel System
I only used 93+ octane fuel in the bike. Avoid fuel with ethanol because it may dissolve plastic carb parts in older bikes.
The bike uses Dellorto "Pumper" carburetors, that is the carbs have a built-in accelerator pump. Do not twist the throttle with the engine off or you will flood the carbs! Don't let your friends or children twist the throttle either! The throttle slides have a groove milled in one side with a little bump in the groove. The bump actuates a lever that presses a diaphragm to squirt extra fuel into the carb body as you come off idle.
The front and rear cylinders are jetted differently at the factory. I believe this is because the front cylinder runs a little hotter because air to cool it is blocked by the front wheel.
Because of no-lead fuel, I richened up the mixture a notch on both cylinders because I was worried the bike would heat up on long trips. This is probably unfounded, but the bike works OK, so I never changed back to the original jetting. I also use Stewart-Warner octane booster/fuel stabilizer gas additive from auto parts stores. I think it helps prevent degradation of the valve seats designed for leaded fuels. Just follow the mixing instructions.
Air Cleaners
I used the original air boxes for a while. Older Harley air filters will fit in them. Later, dissatisfied with the leakiness of the design and the difficulty of changing the front filter (mounted under the tank), I rigged up a system that used foam filters. I used a short flexible automotive heater hose that curled around from the front carb to the foam filter hung below the tank with a bracket. The rear filter attached directly to the rear carb. As far as cleaning the air, these were great. But they are hard to clean -- the foam filter oil is sticky and makes a mess. I finally switched to a pair of washable Emgo filters that hang off the end of the carbs. These breathe a little freer, and I felt some performance improvement. Since they are relatively small, they should be cleaned frequently, especially in dusty environments. Wash them in kerosene or with dish detergent, dry thoroughly, and oil lightly. To wash them, you can also put them inside a sock and run them through a washing machine, then dry them in the dryer.
Mufflers
The original mufflers were probably Franconis, but the bike had a pair of no name "shorties" when I bought it. The cost of Contis or Bubs was out of reach, so I ordered a set of 30" megaphones from JC Whitney. I made new brackets to mount to the mufflers to the frame and sawed off the ends so they would fit over the exhaust pipes. These work fine, and as the baffling blew out over time, the bike's performance improved.
Electrics Alternator and Regulator
The alternator is relatively week at only 150 watts. The Ducati designers did not take into account that many states in the U.S. require the lights be on at all times while riding. Since they didn't plan for this extra load, you need to keep an eye on the battery. I installed a small voltmeter that lets me monitor charging. At low RPM, the voltage from the regulator falls off. The battery will drain down when the bike runs below about 3800 RPM, so I usually cut the lights off when in traffic. Electrex offers a replacement regulator that boosts voltage at low RPMs. Could be worth a try. Willy Gonnanson has a very detailed and informative Ducati Roundcase Bevel Engine Alternator Conversion web page describing how he replaced his alternator with one from an 1998 Ducati ST-2.Ignition System
The original ignition system used points, coils, condensers, and plugs. I replaced this system with a pair of Acell electronic ignition amplifiers and Acell coils given to me by local legend Gene Hise. The ignition amplifiers do not need the original condensers and reduce the voltage travelling across the points. I found that this system produces a very hot spark. It draws about 8 amps of current, which is higher than the original system. The down side of this is that it tends to run the battery down faster at low RPM. Dyna makes a pointless electronic system that looks very good.
For a long time I used Champion L82YC plugs with an extended tip. Later a parts dealer pointed out that his book recommended L86C for the bike, so I switched with no ill results.
Battery
The bike uses a standard 12N12A battery. The battery charge goes up and down more than other bikes, but it should last a long time because there is no electric starter. I use a battery tender in the winter to keep the charge up.
Controls
The original switches for lights and ignition cut-off were poorly designed so I replaced them with modern switches that look similar. I also rewired the right side switch with heavier gauge wire.
Headlamp
I replaced the original headlight that used a separate bulb with a 35 watt sealed beam unit. I also ran the bulb straight off the switch rather than through the original relay.
Turn Signals
I never use the turn signals because there is a buzzer wired in series that sucks up a lot of current. The buzzer is located under the seat and should be removed and run over with a heavy truck several times. At low speeds, the "flasher" never warms up enough to blink. At high speeds, the signals start working, but draw too much current through the stupid buzzer. I use tried and true hand signals.
Horn
I never use the horn. The horn works on the same principal as other Lucas or Ducati electrics: when you blow the horn, it becomes quieter outside I think it works at high speed, but I'm not sure. There is also a switch on the dash that reads "City/Country." No this is not hooked up to a Nitro system, rather it controls the tone of the horn. Since the horn is so pitifully weak, it doesn't seem to make much difference.
Running Gear Front Forks
The front forks would benefit from Progressive Suspension dual rate springs to smooth out the ride. The Progressive springs use a dual rate: softer at the beginning, then stiffening up as they become more compressed.
Rear Shocks
These are nitrogen filled Marzocchis that work much better than the originals. I had them rebuilt by John Braden at Jabo's Cycles in Greenville, Tennessee. John is an expert on bevel drive Ducatis and Harleys.
Chain
Keep the chain tight as it improves smoothness. A loose chain results in a lot of vibration. The shifter seal on the right side of the engine weeps a little oil. It sort of acts like an automatic chain oiler.
Tires
I used to use Metzler tires, but then I couldn't afford them. The Chinese tires seem to work fine. Ducatsi cringe when they see non-European tires, but there are millions of motorcycles and motorbikes in Asia, so Asian tire makers must know something. I have never had a problem with Chinese tires. The rear tire wears quickly, I believe due to the torquiness of the engine. The Chinese front tire is larger than a Metzler.
If the bike is cold:
- Kick the starter over twice to circulate oil to the heads.
- Turn the petcocks ON.
- Turn the choke ON.
- Turn the ignition ON.
- Kick the starter two or three times, the bike should start.
- Leave the choke ON for the first 3/4 mile or so. It takes the bike about 4 or 5 miles to warm up.
If the carbs are flooded:
- Turn the ignition ON.
- Open the throttle wide open.
- Kick the starter two or three times with the throttle open, the bike should start with a roar.
After the bike is warm:
 |
 |
|